My name is Angie Ficek and I am a Program Evaluator at Professional Data Analysts, Inc., a small firm in Minneapolis, MN specializing in public health evaluation. Last year as I was writing a report, I had the burning desire to wrap a paragraph of text around a smaller chart. This is usually easy to do in Word, except I was using automatic captions for my chart titles so that my figures and tables were automatically numbered. Therefore, my chart titles were outside of my chart and did not travel well with the chart itself.
With a little Google search, I discovered a little known Word function that allows me to create a frame around a chart, its title, and anything else I want grouped together. The framed components can then be moved around as one object.
Hot Tip: I first had to add the framing function to my Quick Access Toolbar in Word. To do this (in Word 2010), go to File > Options > Quick Access Toolbar menu. Make sure that All Commands is selected in the drop-down menu, and then find Insert Frame from the list of commands. Select Add to add this function to your Quick Access Toolbar and click Ok. Now a bright green circle should appear in your Quick Access Toolbar (located along the top left corner of your screen).
When you want two or more components framed together, such as a chart and its title, first highlight the components with your mouse and then click the green Format Frame circle. A frame will now appear around the selected components.
I recommend changing the color of the frame from black to white. To do this, right click on the frame and select Borders and Shading. Then select a white border. Move the frame to adjust its size and place it in the desired location.
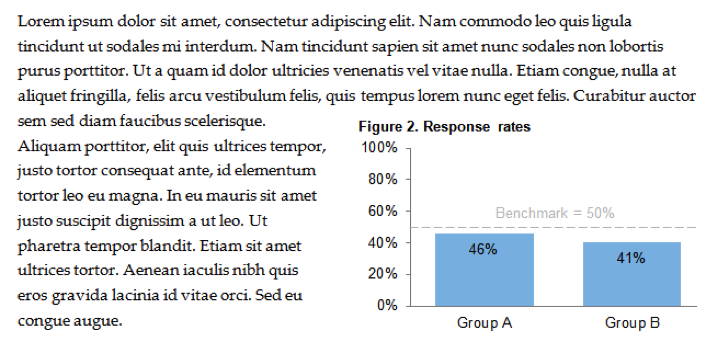
Here is an example of a framed chart and caption next to a paragraph of text:
Lessons Learned:
- The components that you frame still maintain their original functions. Automatic captions still automatically update. Charts can still be edited.
- You can always remove a frame if you decide it’s not needed. Simply right-click on the frame, select Format Frame, and click Remove Frame.
- Avoid having one line of text lingering above or below a frame. I always align my frame along the right side of text and then either align it with the first or last line of the paragraph.
Do you have questions, concerns, kudos, or content to extend this aea365 contribution? Please add them in the comments section for this post on the aea365 webpage so that we may enrich our community of practice. Would you like to submit an aea365 Tip? Please send a note of interest to aea365@eval.org . aea365 is sponsored by the American Evaluation Association and provides a Tip-a-Day by and for evaluators.


Hi Angie,
I’m just about to self publish a book on how to use Excel. There are over 450 illustrations plus text. For the e-book version captions aren’t a problem as the screen grabs are on separate pages. However, there will be a physical book as well.
I’ve just spent half a day trying to get the caption to move with the first image, and clearly it doesn’t work well. So I decided to ask Google, and your blog has given me the answer.
Thank you very much. I can’t quantify exactly how much time you’ve saved me, but it is hours and hours!
All the best,
Justin
Brilliant–thanks very much. This seems much easier than using a text box.
Angie,
Thanks for this simple, quick tutorial! Wrapping text around charts looks much better than plopping a chart in the center of the page – it makes the layout flow more like a cohesive story.
Thanks again, Ann